Last month I started writing with Ingrid, whose awesome blog I have been following for ages. We decided to start an abc-snailmail project, which basically means we send eachother themed snailmail following the letters of the alphabet. So, I kicked off the project with the letter A, then Ingrid sends something back with a theme that starts with a B, etcetera. Such an easy idea, but it boosts your creativity like crazy!
Picking a theme with the letter A was easypeasy: the dutch word for strawberries is "aardbeien", my fav summer fruit, so strawberries it was! I was looking forward to trying some new things and materials, let me take you through some pictures of the mini-package I sent her.
Let's start with an overview of my strawberry mail. I like making my own writing sheets, using various kinds of decoration. For this snailmail, I kept it simple with some red and green watercolor and a black fineliner: hello strawberry stationery. Tied together with my all time favorite baker's twine. I also made Ingrid a blank strawberry postcard. I used some scraps of kraft paper and small dots of glue to create a 'weave'-pattern, and on top of that I glued some mini strawberries cut from paper. And then for the red mystery package at the bottom...
...this strawberry garland was inside! These days most of my letters seem to include some kind of crochet project, I can't emphasize how much I love crochet. I cut some strawberries from red paper. Well, at first they looked like a three-year-old's attempt of cutting hearts, but once I drew tiny seeds on them and crocheted the garland and crowns the red shapes started to look like strawberries ;-)
My masterpiece! I made a felt strawberry envelope! I was super excited about this, since it pretty much turned out like the picture in my head. Take into account this was my first time using felt, I gave myself a small pat on the back. It took quite some time to stitch it all together (how do other people make this seem so easy?), but I discovered two major benefits of felt as an envelope: 1) it's super light! So no worries about sending heavy creative snailmail. This whole package, including letter and bits and pieces weighed 42 grams. And 2) it survived its journey very well. Ingrid already wrote a blogpost about it, the envelope made it in one piece.
Now let's all dig into the last strawberries of this summer, enjoy!
Love,
Anne
Showing posts with label postcard. Show all posts
August 28, 2015
October 27, 2014
OUTGOING MAIL: Long letters
Hello you beautiful readers! It's been a while! Life kind of got in the way, I will be using a brand new mailbox very soon! Yes that's right, me and the boyfriend found ourselves a lovely new apartment, yay for that! (I am sorry for the exclamation mark overload, it's just that I'm THAT excited) The past few days have been about browsing both online and offline stores for awesome pieces of furniture, choosing laminate and the colors we want our walls to have, instead of paper craft and blogging.
Another thing that got in the way was stupid Autumn again, it's getting dark so early these days! When I come home from work, it's already too dusky to take proper pictures. So this has to wait until the weekends, and it's not really like I spend the whole weekend at home waiting for the perfect moment to take pictures of my mail.
Anyway, that's enough excuses for one blog post! The past weeks I have been into long letter writing very much. I always (ALWAYS) send my penpals a proper letter, to me that's what mail is all about. Ofcourse, the paper craft, the washi tape decorations and the bits and pieces you send are lots of fun, but really it's about writing. At least, to me it is.
On the other hand, I love sending things that make the postal system a happier place, so why not combine the two right? Lovely long letters and pretty handmade stationery with lots and lots and lots of washi. For Rinske and Joeylyn, I made a small 'envelope package', which actually is nothing more than two envelopes in different (preferably contrasting) colors glued together. I used the one envelope for my letter, and the other for some matching gifts and handmade goodies.
Like these two handmade postcards, so much fun to make! I have been very much into handlettering these days. It's so relaxing! I can use lots of practice (I am actually considering a calligraphy course!) but I am seeing some improvement, whoop!
Hopefully this gives you some inspiration for an easy but fun snailmail project. It's also a good way to prevent yourself from overloading your envelopes, just use two of them! I like the contrast of a plain kraft envelope and a brightly colored one, but it's so versatile: you can go wild with patterns as well.
Tell me: do you prefer long or short letters? Or maybe a combination, like a medium/short letter and some extra notes, mailtags and lists to go with your letter? What do you write about with your penpals?
I am happy I am back to blogging! Is there anything you would LOVE to read about on my blog? My head is almost overflowing with both creative and blog ideas and this weekend I have taken and edited lots of photos so visit back soon!
Love,
Anne
Another thing that got in the way was stupid Autumn again, it's getting dark so early these days! When I come home from work, it's already too dusky to take proper pictures. So this has to wait until the weekends, and it's not really like I spend the whole weekend at home waiting for the perfect moment to take pictures of my mail.
Anyway, that's enough excuses for one blog post! The past weeks I have been into long letter writing very much. I always (ALWAYS) send my penpals a proper letter, to me that's what mail is all about. Ofcourse, the paper craft, the washi tape decorations and the bits and pieces you send are lots of fun, but really it's about writing. At least, to me it is.
On the other hand, I love sending things that make the postal system a happier place, so why not combine the two right? Lovely long letters and pretty handmade stationery with lots and lots and lots of washi. For Rinske and Joeylyn, I made a small 'envelope package', which actually is nothing more than two envelopes in different (preferably contrasting) colors glued together. I used the one envelope for my letter, and the other for some matching gifts and handmade goodies.
Like these two handmade postcards, so much fun to make! I have been very much into handlettering these days. It's so relaxing! I can use lots of practice (I am actually considering a calligraphy course!) but I am seeing some improvement, whoop!
Hopefully this gives you some inspiration for an easy but fun snailmail project. It's also a good way to prevent yourself from overloading your envelopes, just use two of them! I like the contrast of a plain kraft envelope and a brightly colored one, but it's so versatile: you can go wild with patterns as well.
Tell me: do you prefer long or short letters? Or maybe a combination, like a medium/short letter and some extra notes, mailtags and lists to go with your letter? What do you write about with your penpals?
I am happy I am back to blogging! Is there anything you would LOVE to read about on my blog? My head is almost overflowing with both creative and blog ideas and this weekend I have taken and edited lots of photos so visit back soon!
Love,
Anne
September 15, 2014
OUTGOING MAIL: Extended postcard to Bosnia
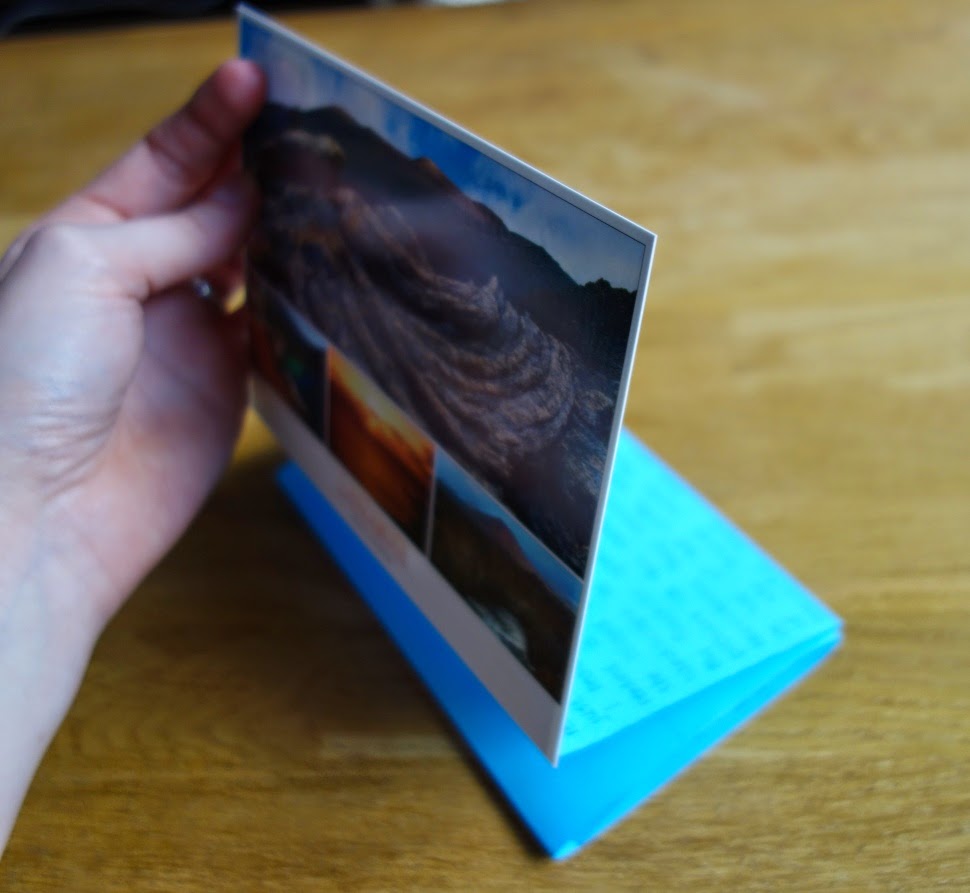
Hello lovely readers, it's been a while! After some time of radio silence, while I was relaxing my ass off on the wonderful island of Lanzarote, I'm back and here to stay! We had an amazing holiday! How have you been?I came home to a very happy mailbox after our holiday! Among all of your lovely letters, was a very cool postcard of Sarajevo from my Bosnian penpal Amra. I brought some tourist cards back from Lanzarote, and wanted to send one of these to Amra. But instead of just putting a plain one in an envelope with my letter, I decided to put a little more effort into it.
Okay, I started selecting pictures for this blog post when I already sent my card away with Mr. Postman. Not such a good idea. Why not? I seriously forgot to take a proper picture of the front of my Lanzarote card. I was like "Are you freaking kidding me?" Nope, turns out I was not. This one above is the best one I have. You have to trust me on my word that Lanzarote is a beautiful place.
Anyway, the whole reason I am writing this post, is to show you that it's really easy to create some extra writing space on your postcards (remember?). I used two blue A4 sheets, adjusted the width to my postcard, stuck them together with double-sided tape and folded them like a harmonica. Yes, it's so easy I was seriously reconsidering this post.
Since I did not use washi tape for a whole week (I nearly started peeling off random things), I obviously had to use it on this letter. By the way, you won't believe what happened to my previous letter to Amra! It ended up on BARBADOS of all places! Because you know, it was addressed to Bosnia & Herzegovina, which is so close to Barbados and sounds very much alike.
Well, I finished my letter off with some dark blue cotton thread and a label that nicely matched the theme of my letter and the postcard. Hopefully Amra will like the card!
I'm very happy to be back, crafting away, taking pictures, blogging. Expect some new blogposts real soon!
Love,
Anne
Labels:
blue,
holiday,
outgoing mail,
postcard,
snailmail
August 18, 2014
OUTGOING MAIL: Typically dutch postcard
A few months back I bought some pretty cute typically dutch postcards. I have been wanting to use them for snailmail ever since, but I love writing long letters and postcards don't really have enough space for that. I stitched in some extra writing sheets, and I am quite excited about the result, so I thought I'd share some photos and a little how-to.
So first things first: my lovely postcard! I guess the photo speaks for itself. Looks pretty damn cute right? And I just love the matching envelope.
Since the postcard mostly has blue-ish colors, I used two pieces of thin light blue paper as extra writing sheets (A4). I folded the paper in half, en slipped them into the postcard. I measured 1/4 from both edges of the card and put a needle through. I used dark blue thread to 'stitch' (this really isn't proper stitching, just putting some things together with thread) everything together. Make sure you don't pull too tight, the thread could cut your paper. Lastly, I cut along the edges of the card to make the writing sheets the right size.
I happened to have some paper with a dutch theme lying around as well, which matched my postcard perfectly. I always love sending some little gifts with my letters, so I made a small paper bag out of the patterned paper and put some flower stickers (do I spot a tulip there?!) in it.
I like experimenting with handlettering and different fonts, and I like how the inside of the postcard turned out. The washi tape really helped me writing in a straight line neatly.
I (obviously) decorated every writing sheet with washi tape. I mean, what is a letter without washi really? I couldn't go without! The flower patterned tapes are from HEMA, I'm not sure where I bought the red one. I thought these washi tapes went pretty well together, it gives everything a bit of a 'folklore' touch.
And well, that's pretty much it! A perfect solution for a lack of writing space in your postcards. I am definitely doing this more often!
Love,
Anne
So first things first: my lovely postcard! I guess the photo speaks for itself. Looks pretty damn cute right? And I just love the matching envelope.
Since the postcard mostly has blue-ish colors, I used two pieces of thin light blue paper as extra writing sheets (A4). I folded the paper in half, en slipped them into the postcard. I measured 1/4 from both edges of the card and put a needle through. I used dark blue thread to 'stitch' (this really isn't proper stitching, just putting some things together with thread) everything together. Make sure you don't pull too tight, the thread could cut your paper. Lastly, I cut along the edges of the card to make the writing sheets the right size.
I happened to have some paper with a dutch theme lying around as well, which matched my postcard perfectly. I always love sending some little gifts with my letters, so I made a small paper bag out of the patterned paper and put some flower stickers (do I spot a tulip there?!) in it.
I like experimenting with handlettering and different fonts, and I like how the inside of the postcard turned out. The washi tape really helped me writing in a straight line neatly.
I (obviously) decorated every writing sheet with washi tape. I mean, what is a letter without washi really? I couldn't go without! The flower patterned tapes are from HEMA, I'm not sure where I bought the red one. I thought these washi tapes went pretty well together, it gives everything a bit of a 'folklore' touch.
And well, that's pretty much it! A perfect solution for a lack of writing space in your postcards. I am definitely doing this more often!
Love,
Anne
Subscribe to:
Posts (Atom)